OIDC / SSO
Settings > OIDC / SSO connects BookOrbit to an OpenID Connect identity provider so users can sign in with a single click instead of managing a separate password. You can add multiple providers and each one appears as its own button on the login page.
BookOrbit supports any OIDC-compliant provider. Keycloak, Authentik, Authelia, and Pocket ID have all been tested and work out of the box.
Setup Checklist
For a first working OIDC login:
- Give yourself the
manage_app_settingspermission (superusers have it by default). - Open Settings > OIDC / SSO.
- Click Add Provider.
- Enter the provider identity: slug, display name, and optional icon URL.
- Enter the connection details: issuer URI, client ID, client secret, and scopes.
- Click Test to verify BookOrbit can reach the provider.
- Configure claim mapping if your provider uses non-standard claim names.
- Enable Auto-provision users if you want accounts created on first login.
- Turn on Allow local account linking if existing local users should be matched by username.
- Save the provider.
WARNING
If you have existing local users who will log in via OIDC, enable Allow local account linking on the provider. Without it, those users will see a "Your account has not been set up" error because BookOrbit cannot match their OIDC identity to their existing account.
Permissions
| Permission | Access |
|---|---|
manage_app_settings | Create, edit, and delete OIDC providers. Configure group mappings. |
| Any authenticated user | Link and unlink OIDC identities in their own account settings. |
| Superuser | Full access to all OIDC configuration. |
OIDC provider configuration is a global setting. The login buttons are visible to everyone when at least one provider is enabled.
Providers
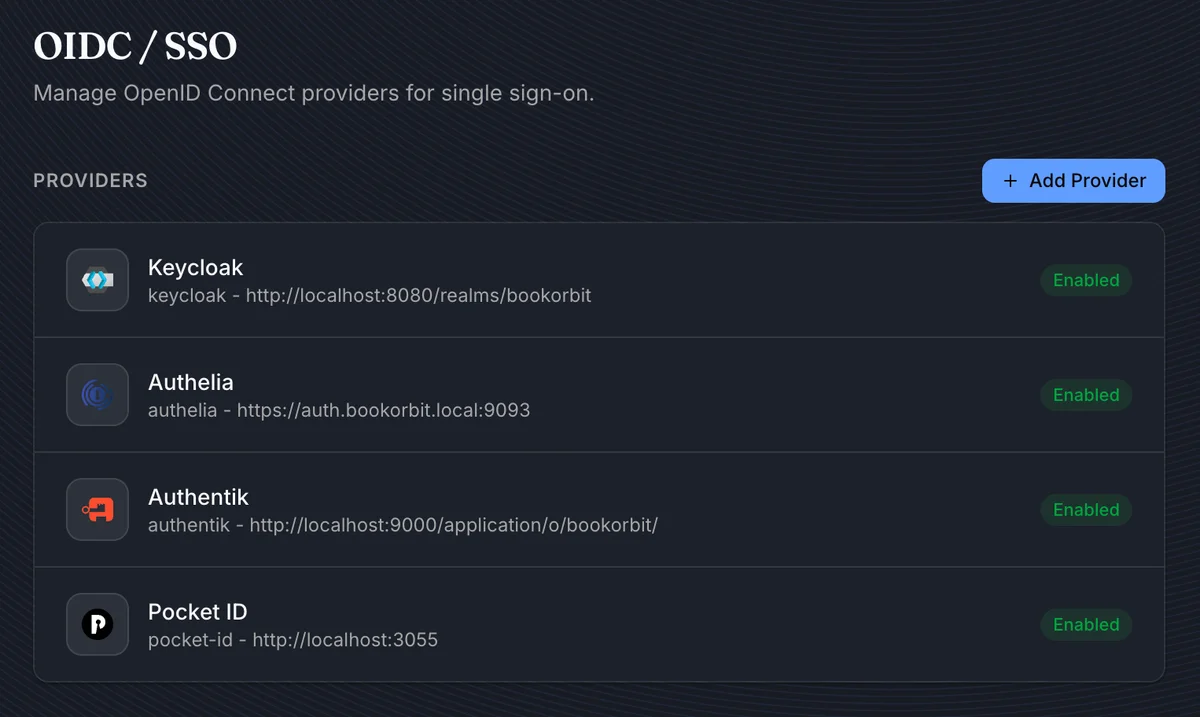
The main page lists all configured providers with their slug, issuer, status, and icon. Click a provider to edit it, or click Add Provider to create a new one.
Providers can be enabled or disabled independently. A disabled provider does not appear on the login page, but its configuration is preserved.
Adding a Provider
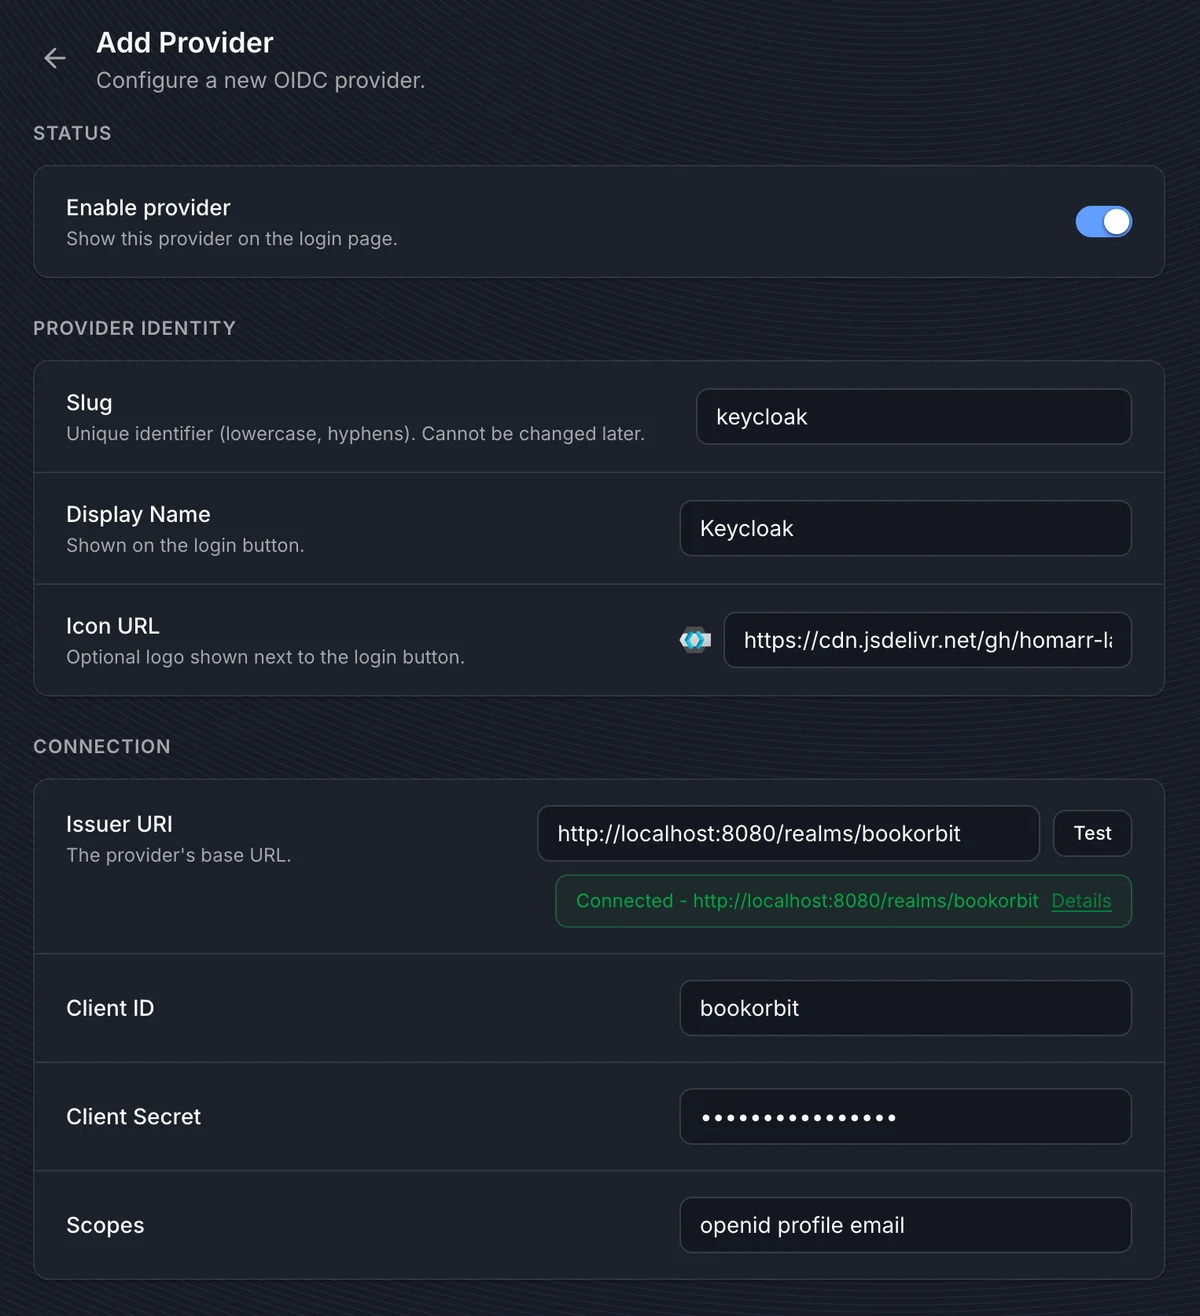
Provider identity
| Field | Purpose |
|---|---|
| Slug | Unique identifier used in URLs and internal references. Lowercase letters, numbers, and hyphens, starting and ending with a letter or number. Cannot be changed after creation. |
| Display Name | Label shown on the login button, e.g. "Keycloak" or "Company SSO". |
| Icon URL | Optional URL to an icon shown next to the login button. Use a CDN link or a publicly accessible image. |
Connection
| Field | Purpose |
|---|---|
| Issuer URI | The provider's base URL. BookOrbit uses OIDC discovery (.well-known/openid-configuration) to find authorization, token, userinfo, and JWKS endpoints automatically. |
| Client ID | The client identifier registered in your provider for BookOrbit. |
| Client Secret | The client secret, if your provider requires one. Some providers (like Authelia) use public clients and do not need a secret. |
| Scopes | Space-separated list of scopes to request. The default openid profile email works for most providers. Add groups if you plan to use group-based permission mapping. |
Click Test after entering the issuer URI to verify that BookOrbit can reach the provider's discovery document. A green "Connected" badge confirms the connection.
TIP
The issuer URI must be reachable from the BookOrbit server, not just from your browser. If BookOrbit runs in Docker and the provider runs on the host, localhost in the issuer URI may not resolve correctly inside the container.
Redirect URI
Your OIDC provider needs to know where to send users after authentication. Set the redirect URI (sometimes called "callback URL") in your provider to:
https://your-bookorbit-url/oauth2-callbackReplace https://your-bookorbit-url with your actual BookOrbit URL. This must match exactly, including the protocol and port if applicable.
Claim Mapping
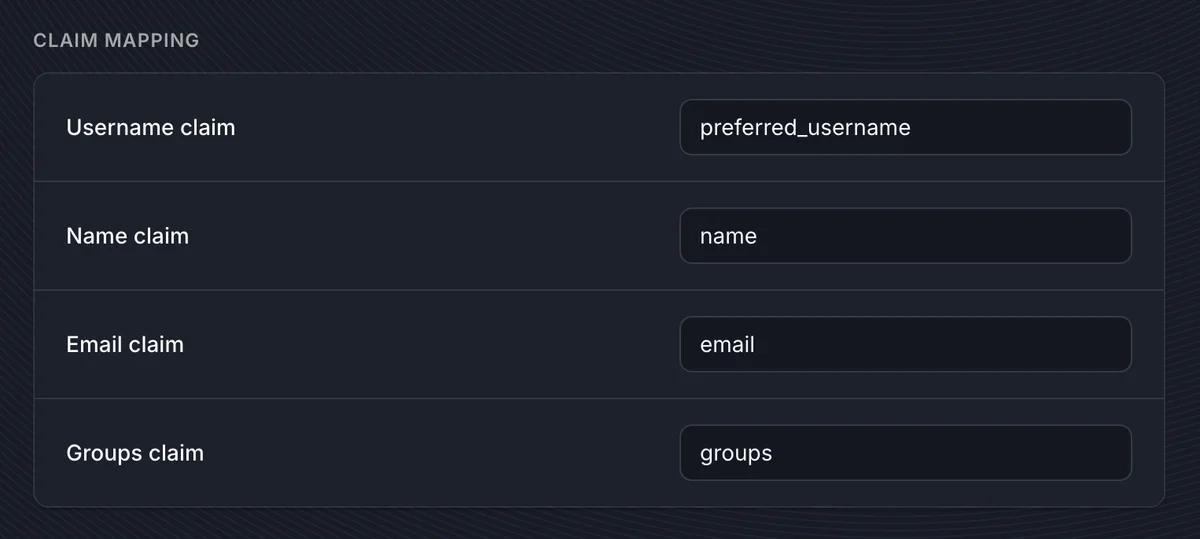
Claim mapping tells BookOrbit which fields in the OIDC token contain the user's profile information.
| Claim | Default value | Purpose |
|---|---|---|
| Username claim | preferred_username | Maps to the BookOrbit username. Used for local account linking when enabled. |
| Name claim | name | Maps to the user's display name. |
| Email claim | email | Maps to the user's email address. |
| Groups claim | groups | Maps to group membership for permission syncing. Only needed if you configure group mappings. |
The defaults work with most providers. Only change these if your provider uses non-standard claim names.
TIP
Use the Preview Claims button on a saved provider to see exactly what claims your provider returns. This is the quickest way to find the right claim names and verify that groups are included.
Auto-Provisioning
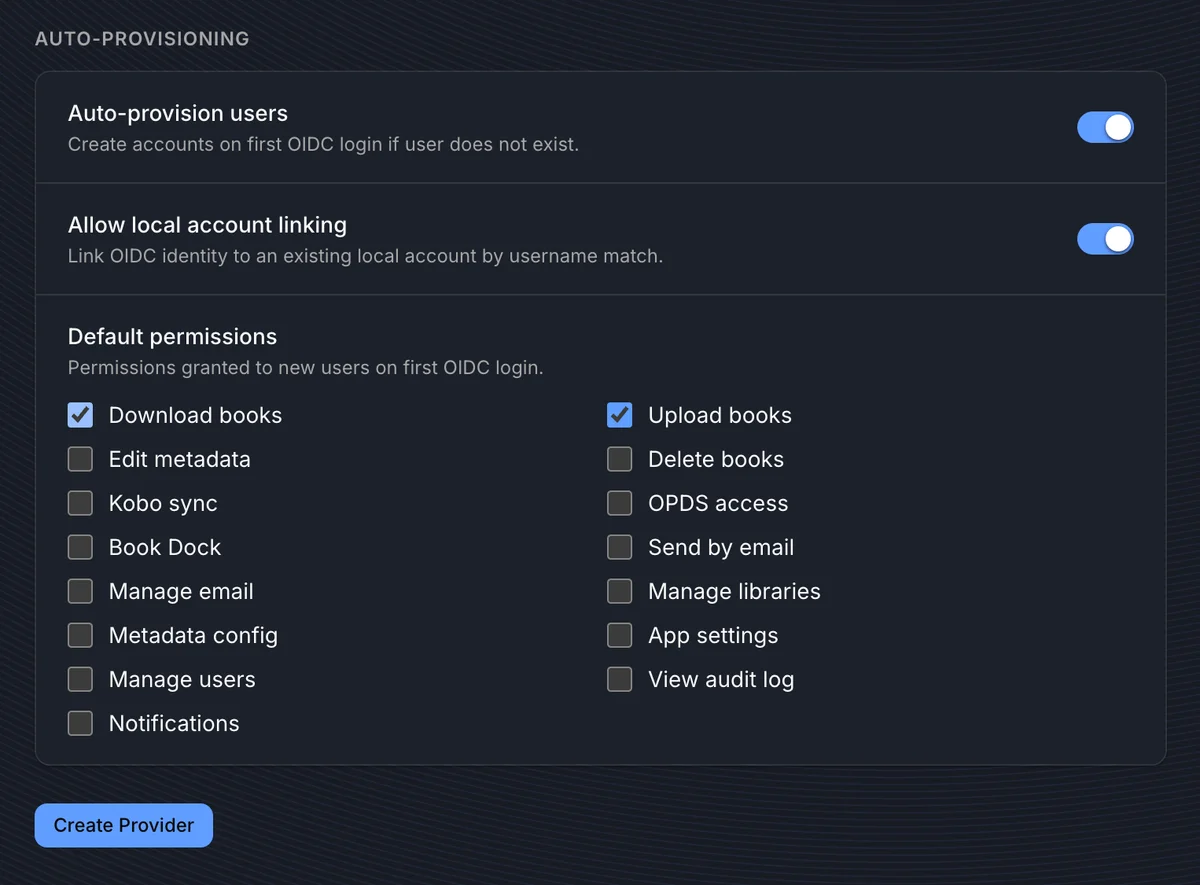
Auto-provisioning controls what happens when a user logs in via OIDC for the first time.
Auto-provision users
When enabled, BookOrbit creates a new local account automatically on first OIDC login if no matching account exists. When disabled, a user must already exist in BookOrbit before they can log in via OIDC.
Allow local account linking
When enabled, BookOrbit matches the OIDC username claim against existing local usernames. If a match is found, the OIDC identity is linked to that existing account instead of creating a new one.
DANGER
This is the most common source of login failures. If you have existing local users and enable OIDC without turning on Allow local account linking, those users will see "Your account has not been set up" when they try to log in via OIDC. BookOrbit sees them as unknown OIDC users and either refuses login (if auto-provisioning is off) or creates a duplicate account (if auto-provisioning is on but linking is off).
Always enable this setting when adding OIDC to an instance that already has local users.
Default permissions
Permissions selected here are granted to newly auto-provisioned users on their first OIDC login. These are applied once at account creation and are not re-evaluated on subsequent logins.
If you also configure group mappings, group-based permissions are synced on every login and take precedence for the permissions they manage.
Group Mappings
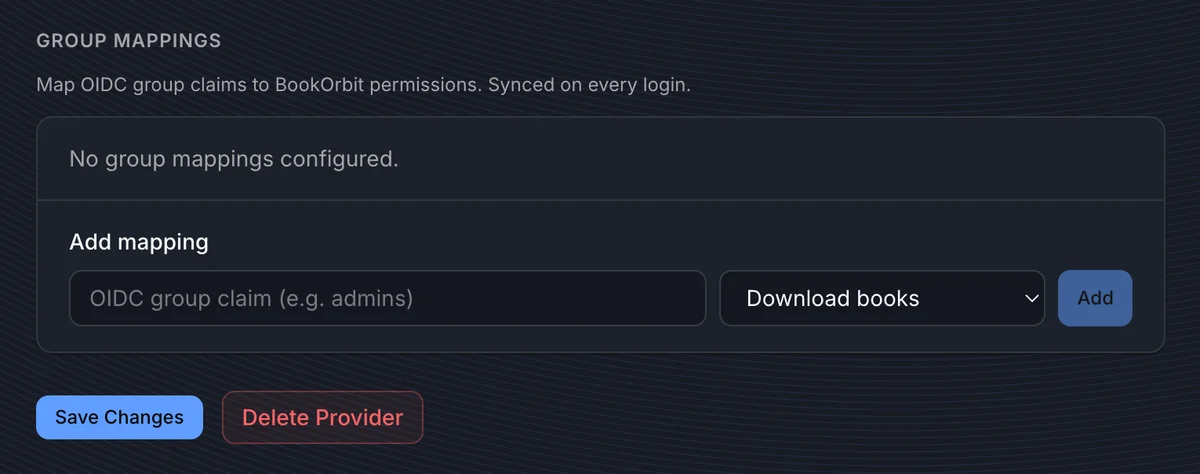
Group mappings let you automatically assign BookOrbit permissions based on the user's group membership in the identity provider. Mappings are configured per provider, and are only available after the provider is first saved.
BookOrbit has no internal concept of groups. The "group" here is a value that comes from your identity provider's token - BookOrbit reads it and uses it only to decide which permissions to grant.
How it works
- Your provider sends a groups claim in the ID token or userinfo response, for example
["admins", "editors"]. - BookOrbit reads the claim using the groups claim name configured in the Claim Mapping section.
- On every login, BookOrbit syncs permissions for that provider:
- Permissions whose mapped group is in the user's current token are added.
- Permissions whose mapped group is no longer in the token are removed.
- Permissions assigned manually or by other providers are preserved.
- If the provider has no group mappings configured, any permissions previously granted via that provider are cleaned up on next login.
One group, one permission
Each OIDC group name maps to exactly one BookOrbit permission per provider. To grant a user multiple permissions, add multiple mappings using different group names - one mapping per permission. The user must be a member of each corresponding group in the identity provider to receive all of them.
For example, to give an admin both manage_users and manage_app_settings:
| OIDC group claim | Permission |
|---|---|
admins | Manage users |
superadmins | App settings |
The user would need to be in both admins and superadmins in their identity provider.
Default permissions vs. group mappings
| Default permissions | Group mappings | |
|---|---|---|
| When applied | Once, at account creation | Every login |
| Scope | All auto-provisioned users from this provider | Only users in matching groups |
| Can remove permissions | No | Yes |
| Manual permissions preserved | N/A | Yes |
TIP
Add groups to the provider's Scopes field if your provider requires it. Some providers include groups in the ID token by default, while others need an explicit scope request or a custom scope mapping. Use Preview Claims to verify the groups claim is present and contains the expected values.
How Users Log In
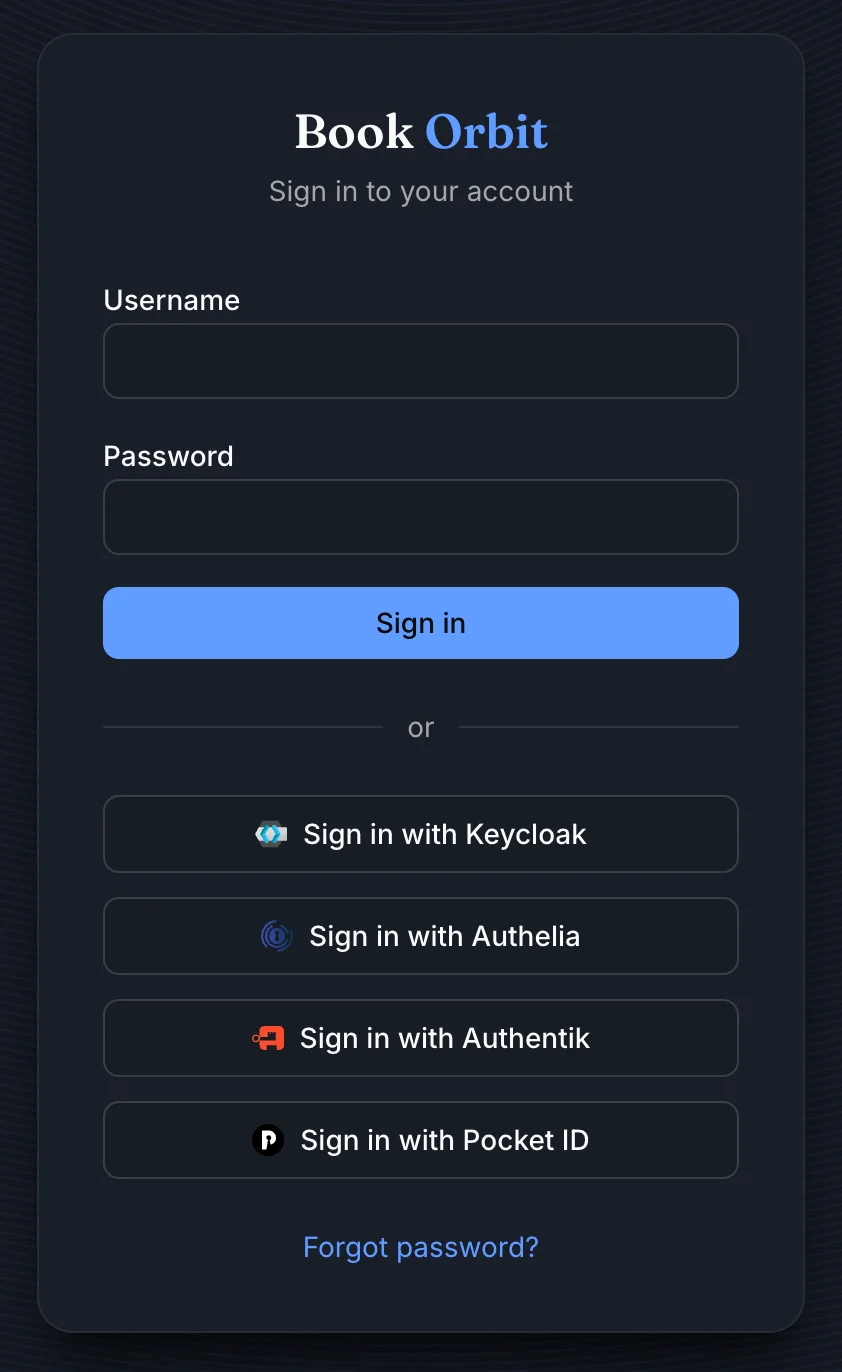
When at least one OIDC provider is enabled, the login page shows provider buttons below the standard username/password form. Users click a provider button, authenticate with the identity provider, and are redirected back to BookOrbit.
The login flow uses PKCE (Proof Key for Code Exchange) for security. No sensitive tokens are exposed in the browser URL.
Account linking from account settings
Users can link additional OIDC identities from Settings > Account without needing admin help. This is useful when a user already has a local account and wants to add SSO login.
Unlinking an OIDC identity requires the user's local password as confirmation. A user cannot unlink their last authentication method: they must have either a local password or another linked identity before they can remove one.
Troubleshooting
| Symptom | Check |
|---|---|
| "Your account has not been set up" after OIDC login | Enable Allow local account linking on the provider if the user already has a local account. Enable Auto-provision users if new accounts should be created automatically. This is the most common issue when adding OIDC to an existing instance. |
| OIDC button does not appear on the login page | Confirm the provider is saved and Enable provider is turned on. |
| "Connection test failed" when testing the issuer URI | Verify the issuer URI is reachable from the BookOrbit server. If BookOrbit runs in Docker, localhost may not point to the host machine. Use the host's IP address or a DNS name instead. |
| User gets a duplicate account after OIDC login | Allow local account linking was off when the user first logged in via OIDC. Delete the duplicate OIDC-provisioned account and enable linking, or have the user link their OIDC identity from account settings on their original account. |
| Group permissions are not applied | Confirm groups is in the Scopes field, the Groups claim name matches your provider's claim, and at least one group mapping is configured. Use Preview Claims to verify the groups claim is present in the token. |
| Permissions disappear after OIDC login | Group mappings sync on every login. If a user was removed from a group in the provider, the mapped permissions are revoked on next login. Manually assigned permissions are not affected. |
| Login fails with a redirect error | Check that the redirect URI in your OIDC provider matches https://your-bookorbit-url/oauth2-callback exactly. Protocol, hostname, port, and path must all match. |
| User shows as inactive after OIDC login | The linked BookOrbit account has been deactivated by an admin. Reactivate the user from the admin user management page. |
| "State expired" error on callback | The login took too long between starting and completing. Try again. The default state TTL is 5 minutes. |
| Cannot delete a provider | A provider cannot be deleted while users have linked OIDC identities. Unlink all users from that provider first, or ask users to unlink from their account settings. |
| "Provider slug already exists" when creating | The slug is already in use by another provider. Choose a different slug. |
| "Issuer URI already exists" when creating | Each issuer URI must be unique. A provider with the same issuer is already configured. |