
Kokoro Text-to-Speech on macOS
Kokoro gives BookOrbit natural-sounding narration without sending book text to a cloud speech service. In this guide, you will run Kokoro directly on your Mac, make sure it can speak, connect it to BookOrbit, and choose the voices your readers can use.
This walkthrough uses Kokoro-FastAPI with Apple MPS. It works especially well with BookOrbit because it includes voice discovery and word timing for spoken-word highlighting.
Before you begin
Section titled “Before you begin”You need:
- An Apple Silicon Mac.
- BookOrbit already running.
- A BookOrbit account with the
manage_app_settingspermission. - Terminal access and enough free space for the Python environment and model.
You will keep Kokoro running in its own Terminal window whenever you want to use narration.
Install the macOS tools
Section titled “Install the macOS tools”Kokoro needs espeak-ng for speech processing and uv to manage its Python environment.
Install Homebrew if needed, then run:
brew install espeak-ngcurl -LsSf https://astral.sh/uv/install.sh | shOpen a new Terminal window if the uv installer asks you to refresh your shell, then check both tools:
uv --versionespeak-ng --versionBoth commands should print a version number.
Install Kokoro
Section titled “Install Kokoro”Create a home for Kokoro, download Kokoro-FastAPI, and install it in an isolated Python environment:
mkdir -p "$HOME/Applications/kokoro"cd "$HOME/Applications/kokoro"git clone https://github.com/remsky/Kokoro-FastAPI.git fastapi-nativecd fastapi-native
uv venv --python 3.10 .venvuv pip install -e .uv run --no-sync python docker/scripts/download_model.py --output api/src/models/v1_0
The model download can take a little while. When it finishes, confirm that Python can see your Mac’s GPU:
uv run --no-sync python - <<'PY'import torchprint("MPS built:", torch.backends.mps.is_built())print("MPS available:", torch.backends.mps.is_available())PYBoth lines should end in True. If MPS available is False, update macOS and restart before continuing.
Start Kokoro
Section titled “Start Kokoro”From the Kokoro folder, run:
cd "$HOME/Applications/kokoro/fastapi-native"
export USE_GPU=trueexport USE_ONNX=falseexport DEVICE_TYPE=mpsexport PYTORCH_ENABLE_MPS_FALLBACK=1export PYTHONPATH="$PWD:$PWD/api"export MODEL_DIR=src/modelsexport VOICES_DIR=src/voices/v1_0export WEB_PLAYER_PATH="$PWD/web"export API_LOG_LEVEL=INFO
uv run --no-sync uvicorn api.src.main:app --host 0.0.0.0 --port 8880
Kokoro is ready when Terminal shows messages similar to:
Application startup complete.Uvicorn running on http://0.0.0.0:8880Leave this Terminal window open. Kokoro stops when you close it or press Control-C.
Make sure Kokoro can speak
Section titled “Make sure Kokoro can speak”Before involving BookOrbit, generate one short sample. Open a second Terminal window and run:
curl -fsS -X POST http://localhost:8880/v1/audio/speech \  -H 'Content-Type: application/json' \  -d '{    "model": "kokoro",    "voice": "af_heart",    "input": "Kokoro is ready for BookOrbit.",    "response_format": "mp3",    "speed": 1.0  }' \  -o kokoro-test.mp3
open kokoro-test.mp3
If you hear the sentence, the Mac side is ready. Keep the Kokoro Terminal running and move on to BookOrbit.
Connect Kokoro to BookOrbit
Section titled “Connect Kokoro to BookOrbit”Open Settings > Server > Text-to-Speech, then select Add provider.
The base URL depends on where BookOrbit runs:
| BookOrbit runs in | Base URL |
|---|---|
| Docker Desktop | http://host.docker.internal:8880/v1 |
| Directly on the Mac, such as a development checkout | http://localhost:8880/v1 |
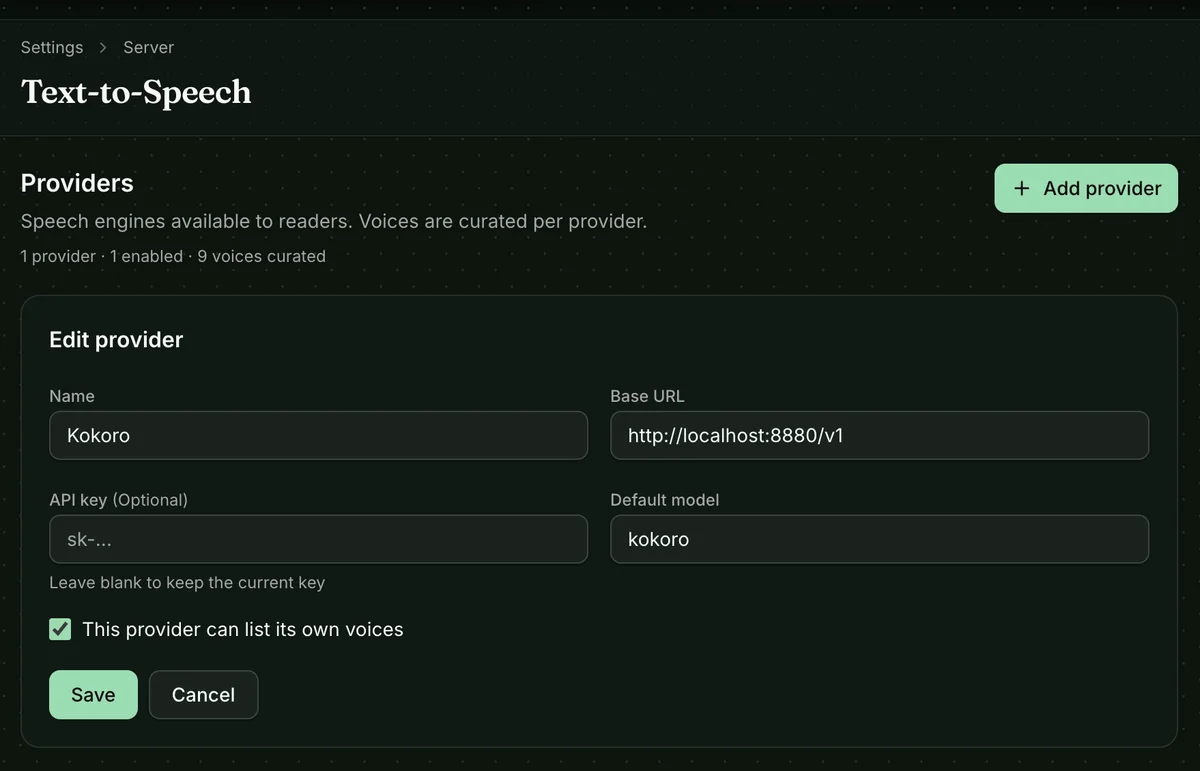
Fill in the provider form:
| Field | Value |
|---|---|
| Name | Kokoro |
| Base URL | The address from the table above |
| API key | Leave blank |
| Default model | kokoro |
| This provider can list its own voices | On |
Select Save.
Expand the new provider and select Test connection. BookOrbit should report Connected and show the number of voices it found.
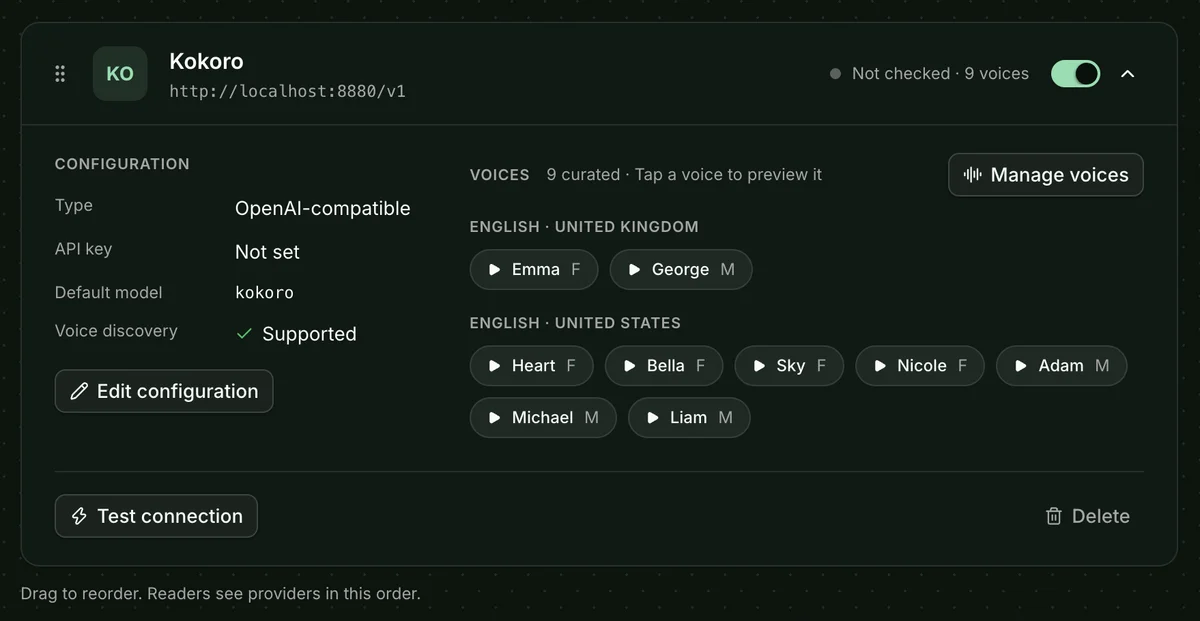
Kokoro and BookOrbit are now talking to each other.
Choose your voices
Section titled “Choose your voices”Kokoro includes many voices, but a shorter list makes the reader’s voice picker easier to use. Select Manage voices, then choose one of these starting points:
- Load Kokoro preset adds a small set of well-known voices with friendly names.
- Import from provider adds every voice reported by your Kokoro server.
Use the speaker button to hear a voice. Remove any you do not want to offer, rename voices if helpful, and then select Save voices.
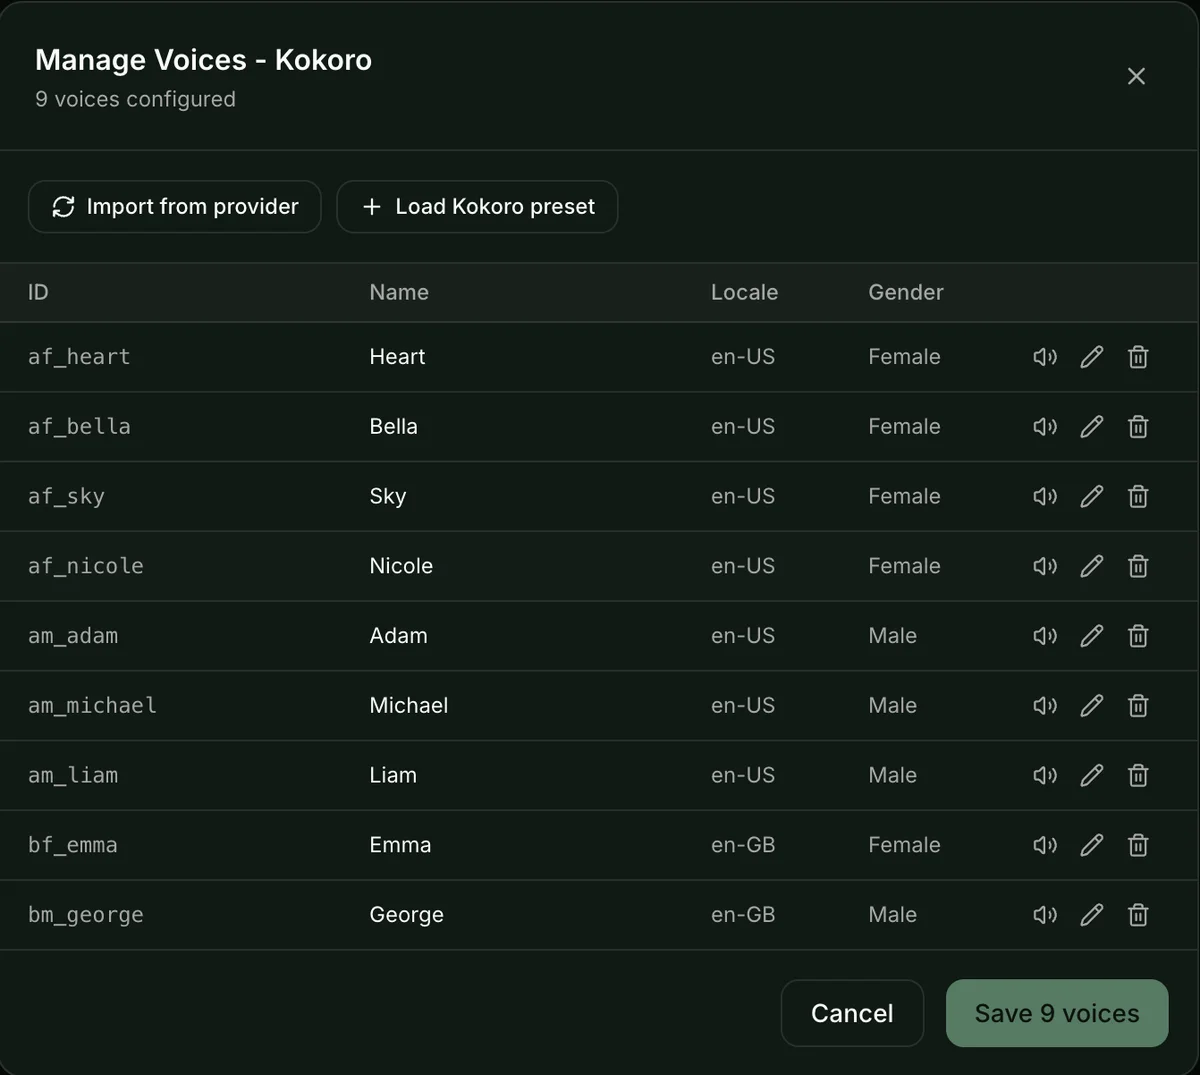
You can return here at any time. The saved list controls which voices readers are allowed to use.
Listen to a book
Section titled “Listen to a book”Open an eBook and choose Listen with narration. Pick one of the Kokoro voices, adjust the speed if needed, and start playback.
BookOrbit remembers your voice and reading position. With Kokoro-FastAPI, the reader can also follow the narration with word-by-word highlighting.
That is the complete setup. For future sessions, you only need to repeat Start Kokoro before using narration.
If something does not work
Section titled “If something does not work”Start with the point where the flow stopped:
| What happened | What to try |
|---|---|
| The sample MP3 was not created | Check the Kokoro Terminal for an error and confirm it says Uvicorn is running on port 8880. |
| The sample works, but BookOrbit cannot connect | If BookOrbit uses Docker Desktop, make sure the base URL uses host.docker.internal, not localhost. |
Port 8880 is already in use | Run lsof -nP -iTCP:8880 -sTCP:LISTEN, then stop the conflicting process or start Kokoro on another port and use the same port in BookOrbit. |
| Kokoro reports CPU instead of MPS | Stop it, then confirm all the environment variables in Start Kokoro are set in the same Terminal before starting Uvicorn. |
| The connection works, but no voices appear | Edit the provider and make sure This provider can list its own voices is on. Then use Manage voices > Import from provider. |
| A voice disappeared from the reader | Check Manage voices. Removing a curated voice also removes it from the reader. |
Prefer faster responses? Use MLX-Audio
Section titled “Prefer faster responses? Use MLX-Audio”MLX-Audio starts speaking faster for the short passages BookOrbit usually sends. It is a good alternative if quick response matters more than Kokoro-FastAPI’s live voice discovery and word-by-word highlighting.
Install it in a separate environment:
mkdir -p "$HOME/Applications/kokoro/mlx-audio-native"cd "$HOME/Applications/kokoro/mlx-audio-native"
uv venv --python 3.12 .venvuv pip install mlx-audio fastapi uvicorn python-multipart webrtcvad "setuptools<81"uv pip install misaki num2words spacy==3.8.5 phonemizer-fork espeakng-loaderuv pip install "en-core-web-sm @ https://github.com/explosion/spacy-models/releases/download/en_core_web_sm-3.8.0/en_core_web_sm-3.8.0-py3-none-any.whl"
Start it on port 8000:
cd "$HOME/Applications/kokoro/mlx-audio-native"uv run --no-sync mlx_audio.server --host 0.0.0.0 --port 8000Add it to BookOrbit using these differences:
| Field | MLX-Audio value |
|---|---|
| Base URL, BookOrbit in Docker Desktop | http://host.docker.internal:8000/v1 |
| Base URL, BookOrbit running directly on the Mac | http://localhost:8000/v1 |
| Default model | mlx-community/Kokoro-82M-bf16 |
| This provider can list its own voices | Off |
After saving, open Manage voices and select Load Kokoro preset. MLX-Audio does not provide the live voice list or word timing, so BookOrbit uses the preset voices and highlights one text block at a time.
CPU-only Docker option
Section titled “CPU-only Docker option”If native Apple GPU acceleration is not available, BookOrbit can run its bundled Kokoro CPU service. From the folder containing BookOrbit’s Compose file, run:
docker compose --profile tts up -dAdd the provider with http://kokoro:8880/v1 as its base URL, kokoro as its model, and voice discovery on. This is the simplest Intel Mac option, but narration starts more slowly than with MPS or MLX.